How to Apply Mobile Skins Perfectly Without Bubbles
(Step-by-Step Guide)
Mobile skins can be used to personalize smartphones and protect the device from minor scratches and harm. Incorrect installation may cause issues with the alignment of phones, bubbles, and even poor performance.
An elegant and professional look can be created with the proper method adhered to. By using high-end skins that are created with precise templates created by AR Mobile Skin, the procedure of applying the skin becomes much simpler and precise.
This article shows how mobile skins can apply flawlessly with no bubbles by following simple step-by-step directions.
Why Proper Installation Is Important
The correct installation is a crucial aspect in the final look of mobile skins.
If the cream isn’t placed correctly,
- The appearance of air bubbles could be due to
- Edges could be lifted
- Dust could get stuck
- It could appear that the design is not aligned.
An effective application process will ensure a professional and smooth outcome.
Tools Required for Applying Mobile Skins
Before beginning, a couple of basics tools need to be arranged.
Essential Tools
- Microfiber cloth
- Alcohol wipes
- Dust removal stickers
- Card or squeegee
- A hair dryer or a heat gun (optional)
This tool helps to create an uncluttered and free of bubbles installation.
Step 1: Clean the Phone Surface
First, you must get the phone clean.
The surface must be free of
- Dust
- Oil
- Fingerprints
An alcohol-based wipe can be utilized to scrub the phone’s surface. After cleansing the phone, it must be dried with microfiber towels.
A clean surface ensures better adhesion.
Step 2: Remove Dust Particles
Even dust particles of a small size can create bubbles.
The dust removal tape or stickers are a great way to get rid of the remaining dust particles.
This is crucial to ensure a smooth and perfect finish.
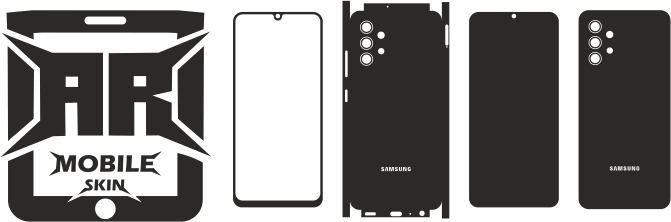
Step 3: Align the Mobile Skin
Prior to applying the skin it is important to check the alignment.
The skin’s alignment should align to:
- Camera cutouts
- Edges
- Logos and logo areas
Mobile skins that are created with accurate templates can be aligned properly.
Also read: How Mobile Skin Templates Increase the accuracy of cutting
Step 4: Apply the Skin Slowly
The layer that covers the skin needs to be removed gradually.
The skin is put on from one end one side to the other.
This technique helps to prevent air bubbles from growing.
Application of the skin in a gradual manner increases the accuracy.
Step 5: Use a Squeegee to Remove Air
A card or a squeegee should be utilized to apply pressure onto the skin.
This is helpful in:
- Take out air bubbles
- Increase adhesion
- Smooth the surface
It is recommended to apply pressure gently in order to prevent damaging the skin.
Step 6: Use Heat for Better Adhesion (Optional)
The use of a hair dryer or hot gun is a good option for enhancing adhesion.
Heating helps vinyl to become more pliable.
The skin can:
- Find a way to work around curves
- Make sure edges are properly adhered to
It is important to apply heat with care so as to prevent excessive heat.
Step 7: Fix Remaining Bubbles
Even if small bubbles are left the bubbles can be eliminated quickly.
Methods are:
- Bubbles are pushed outward
- Utilizing a needle to let out air trapped
- Applying gentle heat
The majority of bubbles go away after installation.
Step 8: Final Adjustment
Following application, the skin must be examined carefully.
Edges must be press-bent to ensure the proper adhesion.
The end result will appear like a smooth, aligned surface.
Common Mistakes to Avoid
A number of mistakes could lead to inadequate performance during installation.
Common errors include:
- The application of skin to a filthy surface
- The installation is being rushed
- Inattention to the alignment
- Utilizing the force to the point of being excessive
By avoiding these mistakes, you can to ensure a superior finish.
Tips for Perfect Installation
These suggestions can help improve performance of installations:
- Clean and dust-free work environment
- The skin is applied slowly
- Use proper tools
- Be careful when heating.
- Try it out on the old devices first.
These tips will ensure high-quality result.
Why Template Accuracy Matters in Installation
A perfect installation can’t make up for poor template quality.
Accurate templates ensure:
- Proper fit
- Proper align
- Clean edges
Templates made by AR Mobile Skin are designed to ensure a precise fit for the various mobile devices.
Also read: Complete Guide to Mobile Skin Templates for the Beginner
Benefits of Proper Skin Application
If applied properly When applied properly, mobile skins can provide a number of advantages.
- The smooth, bubble-free and natural final
- Improved device appearance
- Better durability
- A strong adhesion
A properly installed system improves efficiency and aesthetics.
Conclusion
The application of mobile skins with no bubbles is a careful process that requires a thorough preparation and procedure. Cleaning the skin by aligning the skin in a proper way then applying it gently to ensure a professional and smooth look can be obtained.
Utilizing high-quality skins as well as precise templates can make the procedure easier and much more efficient. Through practice and using the appropriate equipment, anyone can put on flawless mobile skins.
The use of mobile skin increases, proper methods of installation will be vital to get the most effective result.
FAQs
How come bubbles appear under the skin of mobile phones?
Bubbles are usually formed due to being trapped by dust or air when installing.
Can bubbles be removed after applying a skin?
Yes. tiny bubbles are easily eliminated by applying pressure or gently heating.
Is heat necessary for applying mobile skins?
Heating is not required, but it can help increase adhesion and flexibility.
Can I reapply a mobile skin if it is misaligned?
Yes. Many skins are repositionable in a controlled manner.
How long does it take to apply a mobile skin?
The procedure usually lasts between 10-15 minutes.